From time to time I've asked on the various forums and the local bike shops about chopping my VStar. I always got similar answers,..."DON'T DO IT!" or "fine, if all ya want to do is park it and look at it" or "they're impossible to handle".
Well,...one day while looking at chopper related web sites, I came across Seeger Cycle Accessories. Among other things, they offered chopper kits for a lot of different bikes,...including the VStar 650! I had to check this out! How the heck could you KIT a chopper?! I read all the info on the web site but still had a lot of questions. So I started talking to Kurt Seeger, the owner of Seeger Cycle. I must have asked him a hundred questions and asked him for references to guys that had purchased and installed one of his kits. The more I heard, the more excited I got. All the marketing hype sounded great! "Retains stock handling", "safe up to the top speed of the bike", "installs on a stock frame with no modifications", etc, etc, etc. I was skeptical but I was hearing a lot of GOOD things about these kits.
I also did some price comparisons between the cost of the chopper kit and a few tools I would need vs. having a shop chop the front for me. I finally found a place that would/could do it and the price they quoted me was about the same as the kit and tools. The shop quoted me for disassembly, cutting, reinforcing and re-welding the frame, trim paint, extending the forks and reassembly.
At the time, some of my pros and cons were; If I had a shop chop the frame, it would be "professionally" done vs. I didn't know if I could handle the installation of the kit myself. Kurt urged me to have the kit installed professionally unless I had the skills to do it myself. If a shop did the work then the frame would have to be cut and re-welded,...was it safe? vs. "no modifications to the stock frame" for the kit,...I liked that. If the front was chopped and raked at the neck, the stock trail dimension would change thereby changing the handling characteristics,...how much? Would it be drivable? vs. Again, the info on the web site says "retains stock handling up to the top speed of the bike". Well, I mulled these and a lot of other questions over in my mind for about 2 months and finally decided to give the kit a try. I like doing things myself!
I guess to sum it up in a word would be OMYGOD! Everything that Kurt promised was true! The AME chopper kit is a true winner. The kit, as described in the literature, is a "Wide Glide" fork setup that is about 1/2" wider than the stock front end. The kit comes with +8" over stock length fork tubes with a +10" over length option. I went with the +10" option. The installation was straight forward and not at all difficult. The ride is outstanding, the handling characteristics are phenomenal and the look,...well, the look is incredible! The bike has attracted more attention and compliments in the last couple of months than I can describe. Everywhere I go, people are attracted to the bike and the questions are endless!
I'm going to try to provide a step by step account of the installation of the chopper kit and give any insights into the things that I ran across while I was customizing my bike. Many of the pictures here have links to pop ups for larger more detailed views. If you'd like to see the detailed pop up pic just click on the picture on this page. Close the pop up when you're finished to continue reading the page.
|
 |
|
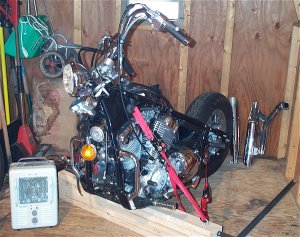
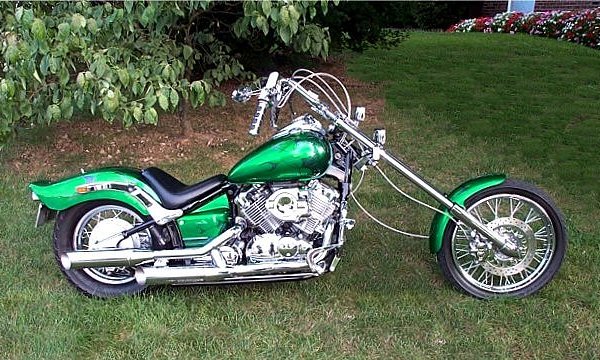
This is a picture of my VStar before I started customizing. I had added a few chrome bits, new handlebars and slash cut the pipes. Other than that, the bike is stock at this point.
|
When the Seeger order arrived, there were two boxes. The first contained the AME chopper kit parts. Included were the upper and lower triple trees, steering stem, steering head adapter block, steel braided speedo cable, steel braided brake hose and a couple bags of miscellaneous hardware, spacers, steering head stop block, front axle and a headlight bracket. The second box held the extended upper fork tubes, tube caps and the fork spring spacers. Everything was either chromed or made of stainless. Once I saw the stainless braided brake hose and speedo cable from Seeger, I just had to have stainless clutch and throttle cables too! Kurt got me the correct cables from Barnett after I measured for the correct length.
|
 |
|
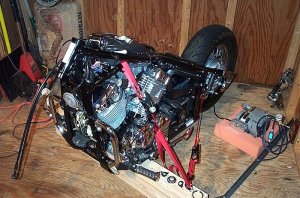
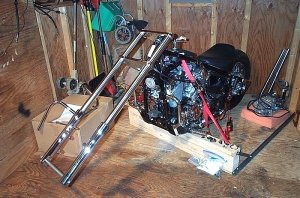
The forks are off and I'm ready to start dismantling the triple trees and steering head assembly.
|
The first thing I did was get the bike up on a lift and tied down for safety. I was also getting a new paint job from Benny Bryant at Fantasies on Wheels so I removed the tank, fenders and side panels. The fenders are each held on by four bolts. I had also removed the exhaust system because I wanted to do a little more work with the slash cut stock pipes.
I loosened the brake hose at the caliper and drained the brake system. Once the brake system was drained I removed the brake hose from the caliper and the master cylinder reservoir. Two bolts and the brake caliper was off the fork. Next was the front wheel. This is easy. Loosen the axle pinch bolt and then the axle bolt itself. I put something under the front tire to take the weight off the axle as I slid the axle through the wheel hub and the lower fork assembly. On the Custom, the front turn signals are mounted to the forks. The fork clamps were removed and the turn signals were removed from the forks as well. I loosened the fork caps while they were still clamped in the trees but I didn't remove them. The two pinch bolts on each tree were loosened and the forks slid out of the triple tree. I took the caps off the forks, drained the oil and removed the spring spacers, spacer washers and springs. The stock spacers, washers and springs are reused with the chopper kit. I took the entire stock fork assembly and the new extended upper fork tubes to a local shop and had them remove the stock upper tubes, install the extended upper tubes and install new fork seals. The cost was about $40 for labor and $40 for new seals.
 |
|
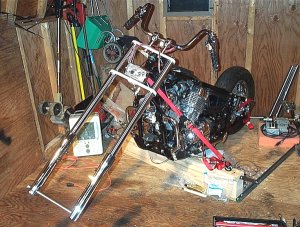
Here, the entire steering head assembly is off the bike. I'm almost ready to start installing the chopper kit.
|
There were a lot of wire harnesses and cables in the way so I removed the side panels to get to all the connectors and cable linkages. Before working on any of the wiring, the battery MUST be disconnected so that there is no danger of shorting anything as it's being worked on. I unplugged the turn signals and headlight harnesses. After removing the turn signals and the headlight I started disassembling the handlebar controls. I disassembled the throttle grip and housing. Then disconnected the throttle cables from the control housing. Next, I removed the grips from both sides. The clutch cable was disconnected from the clutch lever and the cluth lever/left mirror perch and the brake lever/master cylinder were removed. I left the throttle cables and clutch cable on the bike so I could measure the length for new stainless cables with the chopper kit installed.
I unplugged the handlebar control housing wire harnesses. This normally wouldn't have to be done but I was going to hide the wire harnesses inside a new set of bars and chrome the housings, so I disconnected everything. After the handlebars and risers were removed, I was ready to start dismantling the steering head and trees.
The steering stem nut was removed from the top tree. This exposes the steering stem, ring nuts and top bearing. There are two ring nuts. The main one and a top one that is used as a jam nut. I removed the top ring nut and loosened the main one. The steering stem is attached to the bottom tree, so the bottom tree has to be supported as you remove the primary ring nut or the whole thing will simply fall off the bike. Once the main ring nut is removed, the top tree can be lifted off and the bottom tree with the steering stem can be pulled down through the bearings and off the bike. All that's left at this point is the bearing races in the steering head tube.
|
 |
|
This shot shows the steering head tube with the bearing races removed. The new steering head parts for the chopper kit are machined to be a press fit into the bearing race seats.
|
The steering stem bearing races were removed next. Each of the races have a lip that extends out from the seat toward the center of the steering head tube. I used a large flat blade screw driver to remove the races. To remove the bottom race, the screw driver was inserted into the tube from the top and the blade was placed against the bearing race lip. I gently tapped all around the perimeter of the race until it popped out of the seat. The same was done for the top race, except the blade of the screw driver was inserted into the tube from the bottom. I carefully cleaned up everything and was ready to begin reassembly.
|
 |
|
Here is the new upper tree in place along with the bottom spacer block. The bottom tree is attached to the stud machined into the bottom front of the spacer block at the bottom of the steering head tube.
|
Prior to beginning the assembly, the bearing race recesses were coated with grease to protect the surfaces and help with assembly in later steps. With the stock steering stem assembly, the bottom tree is attached to the steering stem and the stem is inserted through the bearings up through the bottom of the steering head tube. With the AME chopper kit, the steering stem is attached to the upper tree by means of a ball joint type bearing, and inserted into the steering head tube from the top. The upper tree and steering stem come as a pre-assembled unit. In the picture above, you can see the ball joint bearing cap on the top tree. The upper tree and steering stem assembly has a machined surface that fits into the upper bearing race seat. It's pulled into the seat as the lower spacer block is attached. The steering stem itself, is drilled and tapped to accept a large bolt inserted up through the bottom of the lower spacer block.
The lower spacer block is a very large, heavy wedge shaped unit that also has a machined surface that fits into the lower bearing race seat. The wedge shape is what provides most of the rake angle for the AME chopper kit. This spacer block also has a machined stud that is used to attach the lower tree. This stud is positioned so that it pushes the center line of the steering head out away from the stock center line of the steering head tube. Essentially what this does is changes the steering head angle without having to modify the stock frame. There is a recessed hole in the bottom of the spacer block that accepts a very large bolt. This bolt is inserted through the bottom of the spacer block and is threaded into the steering stem that is attached to the upper tree. By tightening the bolt, the upper tree and the spacer block are both pulled into their respective bearing race seats in the steering head tube.
|
 |
|
This shows the view of the assembled steering head from the underside. The large rectangular metal piece on the underside of the spacer block is the steering head stop block.
|
The steering stem bolt is located in a recessed hole under the steering head stop block. The steering stem bolt was torqued to about 150 ft./lbs. The smaller bolts and jam nuts on the sides of the spacer block are tightened against the steering head tube to help keep the spacer block from rotating in the bearing race seat. It can't be seen in the picture, but the stud used to attach the lower tree is machined so that a large circlip holds the lower tree in place until the fork tubes are attached and tightened in place. The steering head stop block may be attached in two different positions to allow more or less turning movement of the steering head. I positioned it to the maximum setting,...that is, to allow the smallest turning radius possible.
|
 |
|
Here, the lower tree has been attached to the spacer block and the new forks are being fitted and adjusted in the trees. The new axle is in place to hold everything in alignment while adjusting the trees and forks.
|
The bottom tree has a normal ball bearing assembly that fits onto the stud of the spacer block. I coated the stud and bearing race surface with grease and slid the lower tree in place on the stud. I used strips of masking tape to hold the lower tree in place while I attached the circlip to the stud. Now I was ready for the forks.
I got the forks back from the shop with the lower legs chromed and the new extended upper tubes installed. They looked great! I slid the stock springs, spring washers and stock spacer tubes into the forks. I measured out and filled the shocks with the prescribed amount of fork oil. Next came the new washers and spacers that came with the chopper kit. The new spacers make up for the extended fork length and are used in addition to the stock parts that were removed on disassembly. The fork caps were installed and tightened hand tight. At this point the forks were ready to be inserted into the trees.
I wanted to make sure that I didn't scratch the fork tubes as I was sliding them up through the trees so I wet sanded the inside of the fork rings in the lower tree with 1000 grit wet/dry sand paper to remove any burrs. I put a coat of grease on the fork tubes and the insides of the fork rings. I carefully slid each fork tube up through the bottom tree and temporarily clamped the forks in place with the lower tree pinch bolts. I then torqued the fork caps to spec. After loosening the pinch bolts in the lower tree, I pushed the fork tubes up into the top tree. Large cap bolts are inserted through the top of the upper tree and threaded into the fork caps to hold the forks and the upper tree in alignment. I threaded the new axle in place to align the entire steering head. I double checked the alignment of everything as well as all tolerances and spacing as outlined in the instructions. Then I torqued the fork cap bolts and tree pinch bolts to spec.
|
 |
|
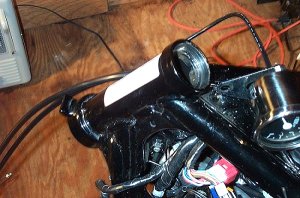
The forks are on and I've started to reassemble the remainder of the steering head. Risers are on with the new handlebars in place. I've started to fit the grips, throttle sleeve, control housings and control wire harnesses.
|
| |
 |
|
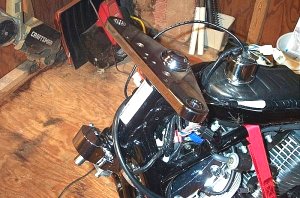
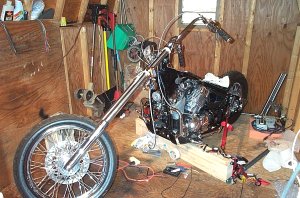
Here I go with the front wheel, lights, turn signals, throttle cables and clutch cable.
|
About this time, I had received my tank, fenders and side panels back from Benny Bryant with my new paint job. It was all finally coming together!
|
< |
|
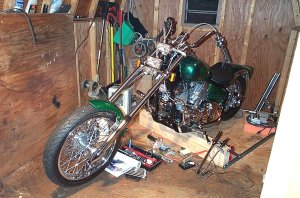
The front brake caliper is on. The fork bullets, cables, hoses, lights and wire harnesses are done. All the painted parts are bolted in place and all I have to do is clean her up a little.
|
Here is the end result. I love the look! The Chopper modification was easy to do with average mechanical skills. There were no specialty tools required. I had to purchase a few large sockets and a large allen wrench socket for the steering stem bolt. A good torque wrench is a must.
|
 |
Handling Characteristics
The first time I drove the bike after installing the chopper kit, I'll admit, I was apprehensive. Sitting on the bike, looking out over the front wheel is something else. The front wheel looks like it's about ten feet in front of you. I was thinking that, "there's no way I can lean this sucker with out the front wheel coming unglued from the pavement!". PLUS, the stock VStar never did turn on a dime,...after all, it's a cruiser not a sport bike. The turning radius is much larger with the chopped version to be sure!
So, off I went! As I tried to steer through low speed turns on my first outing, the bike was really heavy handling and I had to allow for the much larger turning radius. Then what I realized was, in my fear of leaning the bike through the turns, I was trying to hold it upright as much as possible throughout the turn. Ever tried to make a turn without leaning? Once I realized that this thing was rock solid and I became more comfortable with its drivability, it is a breeze to ride. In fact, after driving it for a couple of months, I can honestly say that it IS rock solid. Even with the front frame raised 1", I have scraped the pegs a couple of times,...that's how far you can lean the bike over! The bike DOES like to lean through turns. As I said, It's hands off stable and the long wheel base is very smooth riding.
I've seen some choppers that only a gorilla could ride. The front wheel wanted to snap left or right when starting from a dead stop and was impossible to push or backup using good old fashion muscle power. This bike has no bad characteristics. It doesn't tire you to drive it. I just lean back and cruise! At 5'9" and 165 lbs. I'm not a big guy and I don't have a problem at all driving this bike.
If anyone decides to do the AME kit, the most important piece of advice I can give is to TAKE IT SLOW AND EASY until you get used to it. Driving the chopper kit is hard to describe to someone. IT IS NOT HARD by any means, but,... it is DIFFERENT. I would never go back to the stock setup!!!
|
Elementary Chopper Geometry
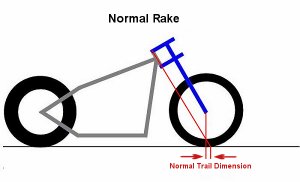
The good and the bad. Here are some basic chopper geometry facts that I discovered in my quest. Probably the most important aspect when planning a chopper project is the trail dimension. The trail dimension is a large factor in determining the handling characteristics of the bike. A proper trail dimension will insure a proper handling bike with no surprises. A trail dimension that is extreme will make a bike difficult to handle and in some cases down right dangerous.
 |
|
A stock setup with normal rake and trail dimensions. With the trail dimension somewhere between 2 to 4 inches, the bike will handle easily at both high and low speeds. Flowing smoothly through curves without swaying or wobbling.
|
| |
 |
|
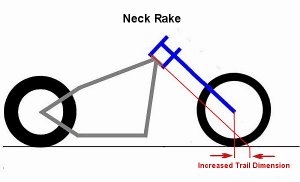
The rake angle is increased at the neck. If the trail dimension is too great, the bike will handle sluggishly at high speeds. It will seem almost too steady. You will have trouble balancing your bike at lower speeds, or on winding roads. It will feel generally sluggish and clumsy.
|
| |
 |
|
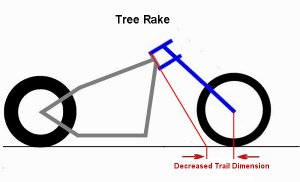
The rake angle is increased at the trees. With too little and in extreme cases negative trail, (steering head angle point falls behind the front axle point), the bike will handle with unbelievable ease at low speeds, but be completely out of balance at high speed. It will easily develop a fatal high-speed wobble. Extremely dangerous!
|
One of the major reasons that I decided to go with the Seeger AME chopper kit is the design of the steering head. AME states that "the bike retains the stock trail dimension" and "is safe and drivable up to the top speed of the bike". The way they do this is to combine both neck and tree rake angles to achieve the overall rake of 14 degrees for the kit. The rake at the neck is approximately 9 degrees and the rake at the trees is approximately 5 degrees, for the 14 degree rake total. The neck rake angle increases the trail dimension and the tree rake angle, in turn, decreases the trail dimension. So, what you end up with is a canceling effect on the trail dimension while the rake angle is increased by 14 degrees. In short, by incorporating both rake methods, the AME chopper kit DOES maintain the stock trail dimension.
|
|
|
|