I've seen several GAK threads and questions lately. I wrote up my recent installation experience. (Sorry for the length!) I cut and pasted from MS Word, so the formatting may not work out.
Zach’s Extra GAK tips for the layperson. Experts will laugh, but these are things I bumped into. Maybe it’ll help someone.
1. Assumptions:
a. You do NOT have stock pipes. If you do, stop here. The GAK is specifically not recommended for use with stock pipes.
b. You are a non-mechanic who wants a performance increase. You’ve had the air cleaner off, and you at least know where the carburetor is. If you’re a gearhead from way back, you don’t need any of what I’m saying.
c. You are slightly intimidated that the GAK comes without any printed instructions included.
d. The installation instructions are found online. READ THE DIRECTIONS CAREFULLY. My sole intent here is to augment those directions.
e. You’re doing this work without taking the carbs off the bike. If total removal is a choice for you, I recommend it. You’ll be beating and banging to remove those 16 well-stuck brass screws; eventually I knocked the carbs off of the cylinder port hoses. The screw removal pain would have been way easier with the carbs off the bike and in a vice. The carbs have various lines running to them, and I just didn’t trust myself to completely take the carbs off and get them back on correctly.
2. As noted elsewhere, I am stupid. I did this work with the bike leaning on its kickstand. It (particularly the left side) would’ve been way easier on my back if I had utilized a bike lift.
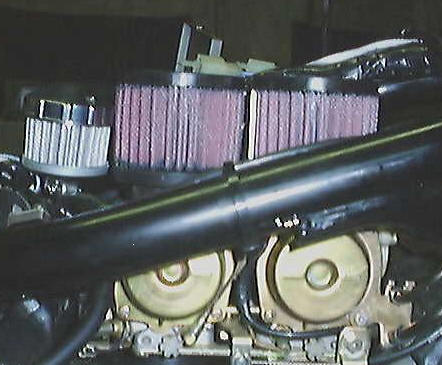
3. Remove seat, speedo, and gas tank. Remove bagel and air boot; they will no longer be used.
4. Remove air box. There are two “invisible” hose clamps held by two “invisible” JIS screws. The instructions do not show a picture of them. Get at them from left side; I used the bike’s screwdriver without the handle. Note that the air box will not be reinstalled.
5. Go ahead and install the small GAK filter on the crankcase breather, as directed. Don’t bother putting the bigger filters on top of the carbs right now. You’ll be moving the carbs around enough that the new filters probably are not gonna stay on, if you place them now.
a. The instructions say to oil the filters. However, if you receive Emgo filters with your GAK kit (not K&N brand), disregard the filter oiling instructions.
6. Right side carb cover removal. The mild beating of the brass screws worked for all the screws except one, which required drilling and screw extraction. Note that the front carb has an additional screw and fitting (which guides a cable) at the lower right that must come off to get to the lower right cover screw. (The pictures show it already removed.)
a. There are instructions out there on building a special drill/screw bit to remove the brass screws. Or you could probably buy something similar. I wish I had; might’ve saved that screw extraction fun.
7. PMS (mixture screws). When you’re seating these (before the 3.5 turns deal), do NOT over-tighten them. I removed mine completely, and got new ones from Tim at MetricMagic.com . (The stock rear PMS screw would not come out, which lead to another screw extraction.)
8. Washer shim installation. First tricky thing is getting the stack (needle, black seat, new shim washers, and circlip) re-inserted in the vacuum slide. I finally used forceps to re-insert it. The white spacer will basically stay in the little spring, so I grabbed the spring with the forceps and put that in. The instructions say to break the nub off the bottom of the black seat; I found this unnecessary. Just drop the needle assembly back down in there and gently rotate, until the nub finds its little space. The second tricky thing is to re-install the white needle cap. One’s fingers won’t fit down in there, and I couldn’t think of anything to grab it with. I (finally) used a fold of Scotch tape (sticky side out) on the end of a flat screwdriver. This sticks the needle cap to the screwdriver blade, and you can find a way to get it started. I used forceps again to get the Scotch tape off the needle cap, then tightened the cap normally.
a. Additional tip: The needle shimming business is best done in good light, on a table, while working over a shallow box. These pieces are TINY, and you ARE going to drop something.
b. Best tip: You will be proud that you were finally able to get the right-side covers off, disassemble and reassemble the needles, and reinstall them with the diaphragm fitted correctly. You will have set the long slide spring aside somewhere. Don’t forget and reinstall the carb covers without the springs (not that I did that—BOTH TIMES!)
9. On the left side, I again had trouble with one of the eight screws. I was about to give up and get the drill and extractor after it, when it finally came. Jet replacement is just as described in the instructions. Except, my rear one was stuck. The stand-off came out with the jet still in it (apparently, I didn’t hold enough force on the back-up). If this happens, be aware of a tiny copper washer that goes with the threads of this fitting.
10. Optional—skip this if you’re keeping the bagel for looks. Remove the lower bagel bracket on the right side of the front cylinder. The upper brackets extend under the head covers. Removing the head cover, you can see those brackets go way back to the other side. Seeing no way to remove them, I gave up and just stuck bolts in the upper bracket holes, to look “official”.
11. If they did separate from the bottom of the carbs, as mine did, loosen the hose clamps from the cylinder port hoses. Reattach the bottom of the carbs to them. When they seat fully, you’ll feel a little “snap”.
12. Now, you can install the Emgo pods, put the bike back together and carb sync. Carb synchronizing is a separate article at http://www.stargis.net/webslinger/Docs/CarbSync.pdf . The article tells you how to carb sync, as well as how to rig up a homemade manometer. I think (remembering we’re laymen, here) one would be better off buying carb sync gauges (which I did). The sync adjustment screw is not the easiest thing to find.
13. So, you’re finished now—but what are these extra stainless washers that are left over from the GAK kit? They’re bigger than the ones you shimmed with, and have no apparent purpose. Looking back to the kit contents list, I see “stainless washers to space off the choke screws”. That confused me, so I emailed Ziv himself and Webslinger. Both answered. (Ziv answered in about two seconds; how’s that for customer support!) “Sometimes the longer screws that hold the carb covers (left side) will interfere with the choke/TPS. It doesn't always happen, but if it does, the washers are included to use as spacers.” Mystery solved. Test ride, and have a beer—in that order, please!
|
|